Building a Software Engineering Agent with LangGraph
First step towards creating a software engineering agent is to understand its role and responsibilities. Here’s a rough sketch:
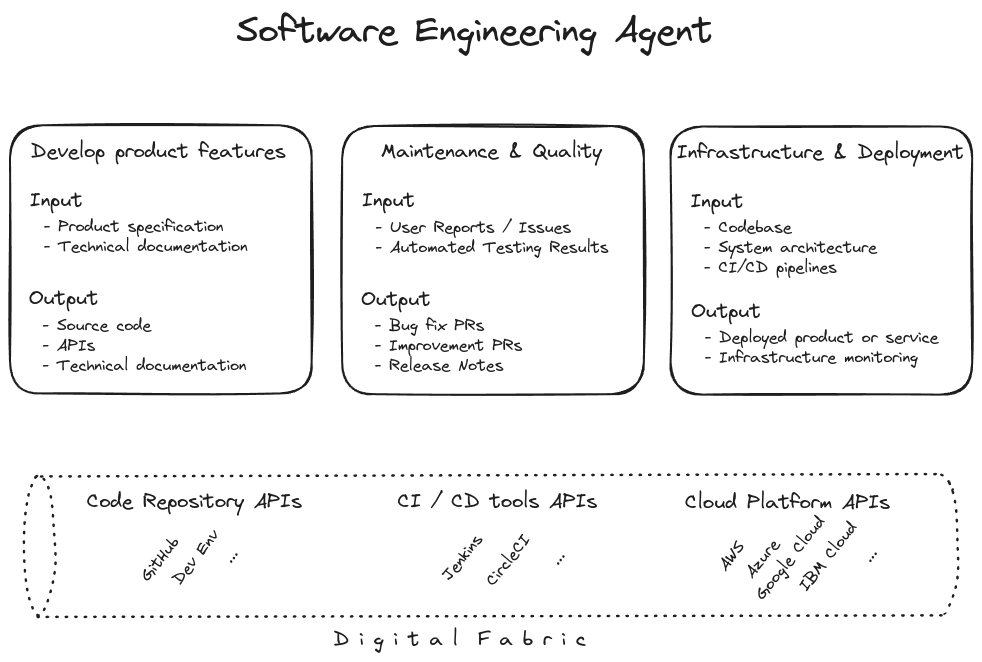
Broadly, we expect a software engineer to develop new features, fix bugs, and deploy. For those tasks the engineer is expected to receive inputs from enterprise internal or external resources. Let’s term these: the digital fabric.
In this work we implement an agent that may perform these tasks using Large Language Models (LLMs). Emulating the behavior of a human agent, we implement onboarding workflows to let our agent gain fine grain understanding at the level of code files, and a higher-order understanding at the level of packages. We also implement runtime workflows where the agent uses this hierarchical understanding to resolve user issues regarding bugs, enhancements, etc.
How to use this repository
Clone, install, and run
- Create and activate a virtual environment
git clone https://github.com/praneetdhoolia/langgraph-se-agent.git cd langgraph-se-agent python3 -m venv .venv source .venv/bin/activate - Install Langgraph CLI
pip install -U "langgraph-cli[inmem]"Note: “inmem” extra(s) are needed to run LangGraph API server in development mode (without requiring Docker installation)
- Install the dependencies
pip install -e . - Configure environment variables
cp example.env .envand edit
.env - Run
langgraph dev
Onboard the Agent on GitHub Repository
- Specify the following configurations:
- Repository URL: E.g.,
https://github.com/<owner>/<repo> - Source Path: E.g.,
src/java/main/com/module - GitHub Access Token: Should have at least read access to the repository.
- Prompts and Models: Defaults provided. May be overriden.
- Repository URL: E.g.,
- Run the Onboard-Graph.
Use the Agent
-
Use the onboarding configurations.
-
Chat with the agent!
Implementation
Let’s now understand the agent workflows!
Onboarding Workflow
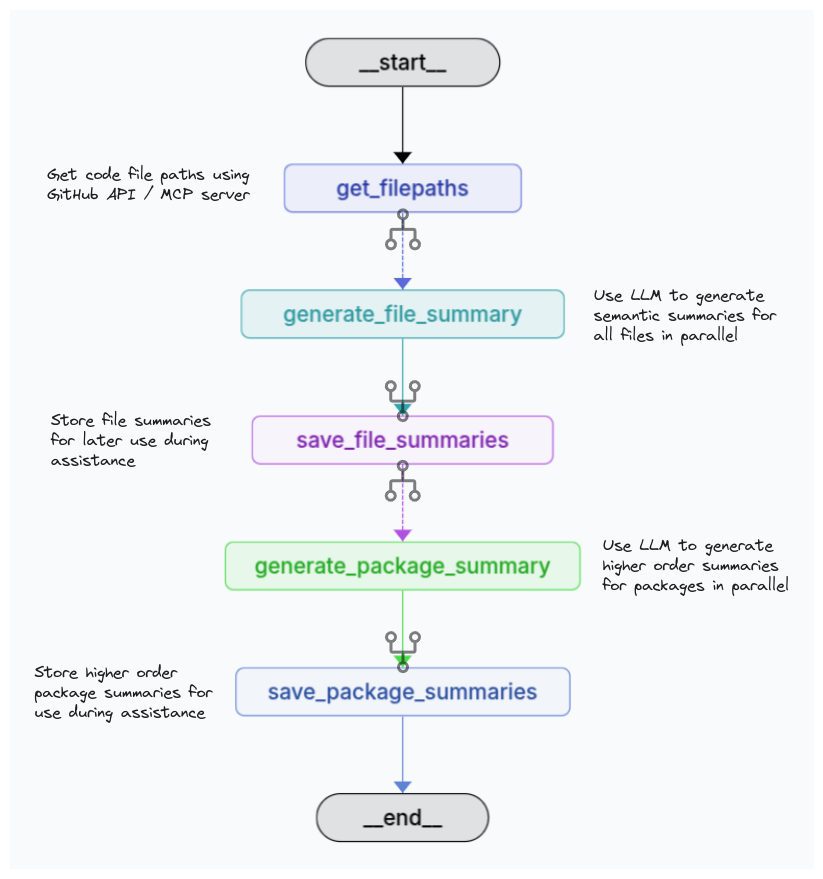
See src/se_agent/onboard_graph.py for implementation details.
One aspect of the implementation worth highlighting is that we generate semantic undertanding for code files in parallel. E.g., if a repository has 1000 files. We make 1000 parallel LLM calls for semantic summary generation, effectively completing it in a single call’s time. This saves a significant amount of time.
from langgraph.types import Send

# ...

def continue_to_save_file_summaries(state: OnboardState, *, config: RunnableConfig):
    """ Maps out over the filepaths, returning a list of `Send` objects. Each `Send`
    object includes target node name and the state to send to that node.
    """
    return [
        Send("generate_file_summary", FilepathState(filepath=filepath))
        for filepath in state.filepaths
    ]

# ...

# Conditional edge from get_filepaths node that parallel forks
builder.add_conditional_edges("get_filepaths", continue_to_save_file_summaries, ["generate_file_summary"])

# ...
Similarly we generate semantic understanding for higher order packages also in parallel.
Assist Workflow
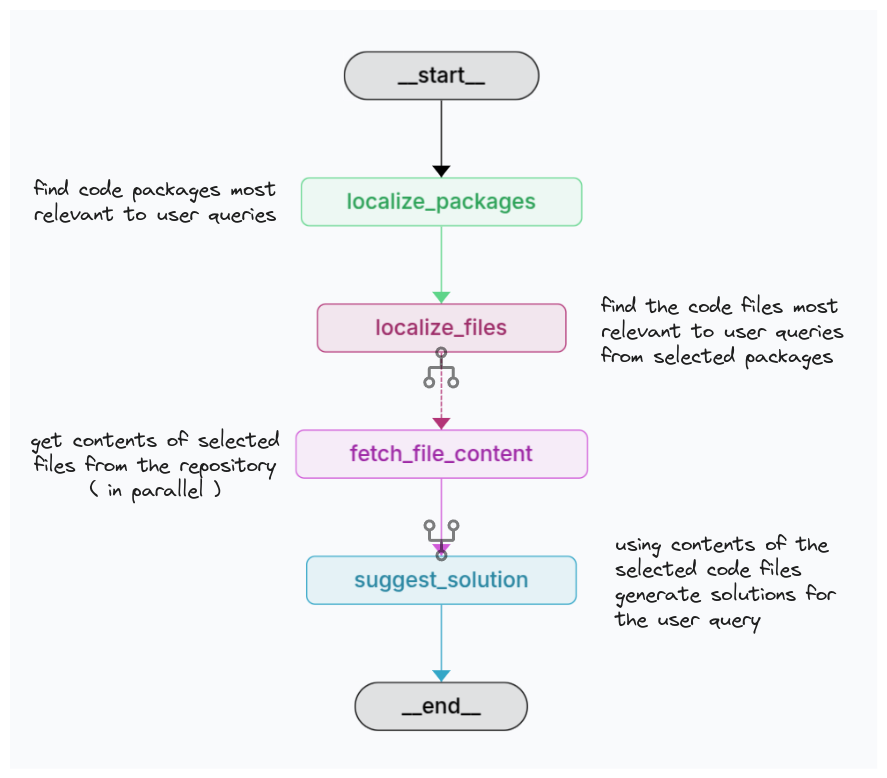
See src/se_agent/assist_graph.py for implementation details.
We follow a hierarchical approach to localize the issue being discussed in the user conversation to the most relevant files, and then generate a resolution using those files.
Why do we use Hierarchical approach?
- Sending the whole code base with every request is not feasible:
- may far exceed the permitted token limit
- generates huge network traffic
- leads to huge LLM costs
- results in less accurate responses
- It is intuitive! Say the code repository was available as a book. The high-order understanding represented by package-level summaries is like a table of contents or outline. Resolving an issue is like answering a question using this book. We’d first consult the table of contents to assess which chapters are relevant. We’d then go to those chapters and assess which sections are relevant, and then answer the question based on those parts. This keeps the context strictly relevant to the query, allowing a faster and more accurate response, all within token limits!